MY mENU


Sunday 1 April 2012

Speeding Up the Dual-Boot Timeout


If you dual-boot your computer with Windows XP and another operating system, you see an operating system selection menu on startup. If you typically boot into Windows XP and not the other operating system, you can speed up the dual-boot timeout value so that you do not wait so long for the boot process to select your default operating system and continue with the boot process. The default timeout value is 30 seconds but you can change this setting to 10. This gives you enough time to select the alternate operating system if you want but also speeds up the boot process. You can skip this section if you do not use a dual-boot configuration.
Follow these steps:
1. Locate the boot.ini file on your computer. It is a hidden file by default; mine is
located in C:\boot.ini.
2. Open the file with Notepad (which is what opens it by default).
3. Change the Timeout value to 10.
4. Select File/Save and close Notepad.

Why Android Developed Based on Linux Kernel?


The libraries and Android runtime rely on the Linux kernel (version 2.6) for underlying core services such as threading, low-level memory management, a network stack, process management, and a driver model. Furthermore, the kernel acts as an abstraction layer between the hardware and the rest of the software stack.

Stopping Remote Assistance and Remote Desktop Sharing


In Windows XP Professional, you have two remote networking features called Remote Assistance and Remote Desktop Sharing. These remote networking features are very helpful in a variety of situations but if you don't use them, it is good idea to disable them to save boot time. You can always enable them later if you want to use them.
1. Open the Start menu, right-click My Computer, and choose Properties.
2.Click the remote tab.
3. Clear both check boxes to disable Remote Assistance and Remote Desktop.

Life Cycle Of JSP


The key to understanding the low-level functionality of JSP is to understand the simple life cycle they follow.

A JSP life cycle can be defined as the entire process from its creation till the destruction which is similar to a servlet life cycle with an additional step which is required to compile a JSP into servlet.

The following are the paths followed by a JSP
  • Compilation
  • Initialization
  • Execution
  • Cleanup

The three major phases of JSP life cycle are very similar to Servlet Life Cycle and they are as follows:

JSP Life Cycle

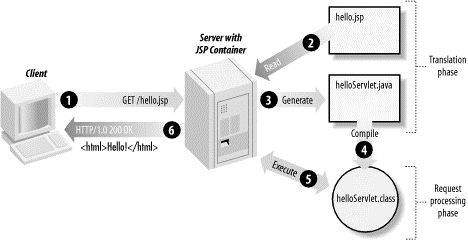
1. JSP Compilation: When a browser asks for a JSP, the JSP engine first checks to see whether it needs to compile the page. If the page has never been compiled, or if the JSP has been modified since it was last compiled, the JSP engine compiles the page.

The compilation process involves three steps:
  • Parsing the JSP.
  • Turning the JSP into a servlet.
  • Compiling the servlet.

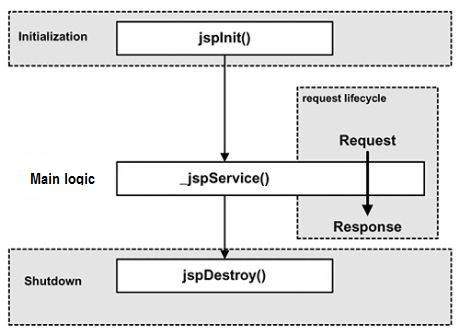
2.  JSP Initialization: When a container loads a JSP it invokes the jspInit() method before servicing any requests. If you need to perform JSP-specific initialization, override the jspInit() method:

public void jspInit(){
  // Initialization code...
}

Typically initialization is performed only once and as with the servlet init method, you generally initialize database connections, open files, and create lookup tables in the jspInit method.

3.  JSP Execution: This phase of the JSP life cycle represents all interactions with requests until the JSP is destroyed. Whenever a browser requests a JSP and the page has been loaded and initialized, the JSP engine invokes the _jspService() method in the JSP.

The _jspService() method takes an HttpServletRequest and an HttpServletResponse as its parameters as follows:

void _jspService(HttpServletRequest request, 
                 HttpServletResponse response)
{
   // Service handling code...
}

The _jspService() method of a JSP is invoked once per a request and is responsible for generating the response for that request and this method is also responsible for generating responses to all seven of the HTTP methods ie. GET, POST, DELETE etc.

4.  JSP Cleanup: The destruction phase of the JSP life cycle represents when a JSP is being removed from use by a container.

The jspDestroy() method is the JSP equivalent of the destroy method for servlets. Override jspDestroy() when you need to perform any cleanup, such as releasing database connections or closing open files.

The jspDestroy() method has the following form:

public void jspDestroy()
{
   // Your cleanup code goes here.
}

JSP Processing:


The following steps explain how the web server creates the web page using JSP: 
  • As with a normal page, your browser sends an HTTP request to the web server.
  • The web server recognizes that the HTTP request is for a JSP page and forwards it to a JSP engine. This is done by using the URL or JSP page which ends with .jsp instead of .html.
  • The JSP engine loads the JSP page from disk and converts it into a servlet content. This conversion is very simple in which all template text is converted to println( ) statements and all JSP elements are converted to Java code that implements the corresponding dynamic behavior of the page.
  • The JSP engine compiles the servlet into an executable class and forwards the original request to a servlet engine.
  • A part of the web server called the servlet engine loads the Servlet class and executes it. During execution, the servlet produces an output in HTML format, which the servlet engine passes to the web server inside an HTTP response.
  • The web server forwards the HTTP response to your browser in terms of static HTML content.
  • Finally web browser handles the dynamically generated HTML page inside the HTTP response exactly as if it were a static page.


All the above mentioned steps can be shown below in the following diagram:

JSP Processing

Typically, the JSP engine checks to see whether a servlet for a JSP file already exists and whether the modification date on the JSP is older than the servlet. If the JSP is older than its generated servlet, the JSP container assumes that the JSP hasn't changed and that the generated servlet still matches the JSP's contents. This makes the process more efficient than with other scripting languages (such as PHP) and therefore faster.

So in a way, a JSP page is really just another way to write a servlet without having to be a Java programming wiz. Except for the translation phase, a JSP page is handled exactly like a regular servlet.

Jsp Architecture


The web server needs a JSP engine ie. container to process JSP pages. The JSP container is responsible for intercepting requests for JSP pages. This tutorial makes use of Apache which has built-in JSP container to support JSP pages development.

A JSP container works with the Web server to provide the runtime environment and other services a JSP needs. It knows how to understand the special elements that are part of JSPs.

Following diagram shows the position of JSP container and JSP files in a Web Application.

JSP Architecture