MY mENU


Monday 27 February 2012

Structures in C++


Structure's in C++:
A structure is a collection of variables under a single name. Variables can be of any type: int, float, char etc. The main difference between structure and array is that arrays are collections of the same data type and structure is a collection of variables under a single name.
Declaring a Structure:
The structure is declared by using the keyword struct followed by structure name, also called a tag. Then the structure members (variables) are defined with their type and variable names inside the open and close braces "{"and "}". Finally, the closed braces end with a semicolon denoted as ";" following the statement. The above structure declaration is also called a Structure Specifier.

Example:

Three variables: custnum of type int, salary of type int, commission of type float are structure members and the structure name is Customer. This structure is declared as follows:
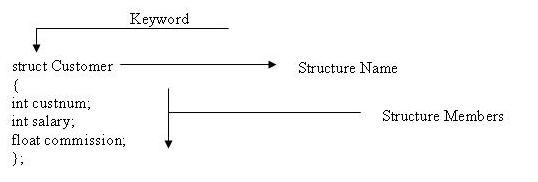
In the above example, it is seen that variables of different types such as int and float are grouped in a single structure name Customer.
Arrays behave in the same way, declaring structures does not mean that memory is allocated. Structure declaration gives a skeleton or template for the structure.
After declaring the structure, the next step is to define a structure variable.
to declare Structure Variable:
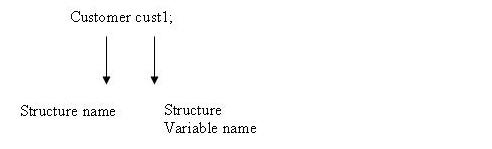
This is similar to variable declaration. For variable declaration, data type is defined followed by variable name. For structure variable declaration, the data type is the name of the structure followed by the structure variable name.
In the above example, structure variable cust1 is defined as:
What happens when this is defined? When a structure is defined, it allocates or reserves space in memory. The memory space allocated will be cumulative of all defined structure members. In the above example, there are 3 structure members: custnum, salary and commission. Of these, two are of type int and one is of type float. If integer space allocated by a system is 2 bytes and float four bytes the above would allocate 2bytes for custnum, 2 bytes for salary and 4 bytes for commission.

 access structure members:

To access structure members, the operator used is the dot operator denoted by (.). The dot operator for accessing structure members is used thusly:
structure_variable_name.member_name

For example:

A programmer wants to assign 2000 for the structure member salary in the above example of structure Customer with structure variable cust1 this is written as:

Friday 24 February 2012

Basic concepts of C++


Before starting to learn C++ it is essential to have a basic knowledge of the concepts of Object oriented programming. Some of the important object oriented features are namely:
          Objects
  • Classes
  • Inheritance
  • Data Abstraction
  • Data Encapsulation
  • Polymorphism
  • Overloading
  • Reusability
Objects:
Object is the basic unit of object-oriented programming. Objects are identified by its unique name. An object represents a particular instance of a class. There can be more than one instance of a class. Each instance of a class can hold its own relevant data.
An Object is a collection of data members and associated member functions also known as methods.

Classes:

Classes are data types based on which objects are created. Objects with similar properties and methods are grouped together to form a Class. Thus a Class represents a set of individual objects. Characteristics of an object are represented in a class as Properties. The actions that can be performed by objects become functions of the class and are referred to as Methods.
For example consider we have a Class of Cars under which Santro Xing, Alto and WaganR represents individual Objects. In this context each Car Object will have its own, Model, Year of Manufacture, Color, Top Speed, Engine Power etc., which form Properties of the Car class and the associated actions i.e., object functions like Start, Move, and Stop form the Methods of Car Class.
No memory is allocated when a class is created. Memory is allocated only when an object is created, i.e., when an instance of a class is created.

Inheritance:

Inheritance is the process of forming a new class from an existing class or base class. The base class is also known as parent class or super class. The new class that is formed is called derived class. Derived class is also known as a child class or sub class. Inheritance helps in reducing the overall code size of the program, which is an important concept in object-oriented programming.

Data Abstraction:

Data Abstraction increases the power of programming language by creating user defined data types. Data Abstraction also represents the needed information in the program without presenting the details.

Data Encapsulation:

Data Encapsulation combines data and functions into a single unit called Class. When using Data Encapsulation, data is not accessed directly; it is only accessible through the functions present inside the class. Data Encapsulation enables the important concept of data hiding possible.

Polymorphism:

Polymorphism allows routines to use variables of different types at different times. An operator or function can be given different meanings or functions. Polymorphism refers to a single function or multi-functioning operator performing in different ways.

Overloading:

Overloading is one type of Polymorphism. It allows an object to have different meanings, depending on its context. When an existing operator or function begins to operate on new data type, or class, it is understood to be overloaded.

Reusability:

This term refers to the ability for multiple programmers to use the same written and debugged existing class of data. This is a time saving device and adds code efficiency to the language. Additionally, the programmer can incorporate new features to the existing class, further developing the application and allowing users to achieve increased performance. This time saving feature optimizes code, helps in gaining secured applications and facilitates easier maintenance on the application.

Thursday 23 February 2012

Enumeration Vs Iterator in Collections

What is the difference between Enumeration And Iterator?


Enumeration

Iterator
1. It is legacy interface and introduced in 1.0 version

1 It is non-legacy and introduced in 1.2 version
2.Applicable only for legacy classes and it is not universal cursor

2. Applicable for any Collection implemented class object.
3.While iterating the elements we are not allowed to remove the objects just we can perform only read operation

3. While iterating we can perform removal also in addition to read operation.
4.By using elements() method we can get Enumeration object

4.   By using iterator() method we can get Iterator   
    object


Iterator
Enumerator

Iterator supports remove() method


Enumerator doesn’t supports remove() method.

It is nor synchronized


It is synchronized


It supports ArrayList, vector, hashmap, hashtable


It doesn’t supports Arraylist, and hashmap.

It doesn’t supports legacy methods


It supports legacy methods like hasMoreElements(),nextElements();

ArrayList Vs LinkedList


ArrayList

LinkedList
1. The underlying data structure is resizable or growable array.

1. The underlying data structure is Double Linked List.
2.  This is Best choice if frequent operation is retrieval and worst choice if frequent operation is insertion or deletion in the middle.

2.  This is Best choice  if frequent operation is insertion or deletion in the middle and worst choice if frequent operation is retrieval .
3. This class implements Serializable , Cloneable and RandomAccess interfaces.

3. This class implements Serializable , Cloneable but not  RandomAccess interface.

Set Interface IN Collections


Set Interface:

Set is a child interface of Collection interface. it can be used to represent a group of individual objects as a single entity where
  • Duplicate objects are not allowed.
  • Insertion order is not preserved
Shorted Set:

it is child interface of Set interface. it can be used to represent a group of individual objects in to a single entity where
  • All the objects are arranged in some sorting order (Can be natural sorting order or customizede).
  • Duplicates are not allowed.
NavigableSet:

It is child interface of SortedSet and provides several utility methods for navigation purposes
  • It doesn’t allows duplicates                                
  • Insertion order is preserved
  • It is introduced in 1.6 version

Arrays Vs Collections


                              Arrays

Collections
1.  Arrays r fixed in size and hence once we created an array we are not allowed to increase or decrease the size based on our requirement.

1. Collections are growable in nature and hence based on our requirement we can increase or decrease the size.
2.  Memory point of view arrays are not recommended to use

2. Memory point of view collections are recommended to use.
3. Performance point of view arrays are recommended to use

3. Performance point of view collections are not recommended to use.
4.  Arrays can hold only homogeneous elements

4. Collections can hold both homogeneous and heterogeneous elements.
5. Arrays can hold both primitives as well as objects

5. Collections can hold only objects.
6. For any requirement, there is no ready method support compulsory programmer has to code explicitly.6. For every requirement ready made method support is available. Being a programmer we have to know how to use those methods and we are not responsible to implement those.

Wednesday 22 February 2012

Data Base in Android (SQLite)

SQLite Database in Android: SQLite is an Open Source Database which is embedded into Android. SQLite supports standard relational database features like SQL syntax, transactions and prepared statements. In addition it requires only little memory at runtime (approx. 250KByte). SQLite is available on every Android device. Using an SQLite database in Android does not require any database setup or administration.

Things to consider when dealing with SQLite:
  1. Data type integrity is not maintained in SQLite, you can put a value of a certain data type in a column of another dataype (put string in an integer and vice versa).
  2. Referential integrity is not maintained in SQLite, there is no FOREIGN KEY constraints or JOIN statements.
  3. SQLite Full Unicode support is optional and not installed by default.
You only have to define the SQL statements for creating and updating the database. Afterwards 
the database is automatically managed for you by the Android platform. Access to an SQLite database involves accessing the filesystem. This can be slow. Therefore it is recommended to perform database operations asynchronously, for example via the AsyncTask class. .
- If your application creates a database, this database is saved in the directory DATA/data/APP_NAME/database/filename. The parts of the above directory are constructed based on the following rules. DATA is the path which the Environment.getDataDirectory() method returns. APP_NAME is your application name. FILENAME  is the name you specify in your application code for the database.

SQLite Architecture

 1.Packages: The package Android.database contains all general classes for working with databases. android.database.SQlite contains the SQLite specific classes.

2. SQLiteOpenHelper: To create and upgrade a database in your Android application you usually subclass SQLiteOpenHelper. In the constructor of your subclass you call the super() method of SQLiteOpenHelper specifying the database name and the current database version. In this class you need to override the onCreate() and onUpgrade() methods. 

  1. onCreate(SQLiteDatabase db): invoked when the database is created, this is where we can create tables and columns to them, create views or triggers.
  2. onUpgrade(SQLiteDatabse db, int oldVersion, int newVersion): invoked when we make a modification to the database such as altering, dropping , creating new tables.This method allows you to update the database schema. 
Both methods receive an SQLiteDatabase object as parameter which represents the database. SQLiteOpenHelper provides the methods getReadableDataBase() and getWritableDatabase() to get access to an SQLiteDatabase object; either in read or write mode. The database tables should use the identifier _id for the primary key of the table.

3. SQLiteDatabase: SQLitedatabase is the base class for working with a SQLite database in Android and provides methods to open, query, update and close the database. More specifically SQLiteDatabase provides the insert()update() and delete() methods. In addition it provides the execSQL() method, which allows to execute SQL directly. The object ContentValues allows to define key/values. The "key" represents the table column identifier and the "value" represents the content for the table record in this columnContentValues can be used for inserts and updates of database entries. Queries can be created via the rawQuery() and query() methods or via the SQLiteQueryBuilder class .

rawQuery() directly accepts an SQL statement as input.
query() provides a structured interface for specifying the SQL query.
SQLiteQueryBuilder is a convenience class that helps to build SQL queries.


4. rawQuery() Example
The following gives an example of a rawQuery() call. the rawQuery method has two parameters:
  1. String query: the select statement.
  2. String[] selection args: the arguments if a WHERE clause is included in the select statement.

      Cursor cursor = getReadableDatabase().
       rawQuery("select * from todo where _id = ?", new String[] { id });

5. query() Example: The following gives an example of a query() call.
return database.query(DATABASE_TABLE,new String[] { KEY_ROWID, KEY_CATEGORY, KEY_SUMMARY, KEY_DESCRIPTION }, null, null, null, null, null); 


The method query() has the following parameters.
Parameters of the query() method
Parameter
Comment
String dbName
The table name to compile the query against.
int[] columnNames
A list of which table columns to return. 
Passing "null" will return all columns.
String whereClause
Where-clause, i.e. filter for the selection 
of data, null will select all data.
String[] selectionArgs
You may include ?s in the "whereClause"".
 These placeholders will get replaced by the 
values from the selectionArgs array.
String[] groupBy
A filter declaring how to group rows, 
null will cause the rows to not be grouped.
String[] having
Filter for the groups, null means no filter.
String[] orderBy
Table columns which will be used to 
order the data, null means no ordering.
If a condition is not required you can pass null, e.g. for the group by clause.
The "whereClause" is specified without the word "where", for example a "where" statement might look like: "_id=19 and summary=?". If you specify placeholder values in the where clause via ?, you pass them as the selectionArgs parameter to the query.

6. Cursor : A query returns a Cursor object . A Cursor represents the result of a query and basically points to one row of the query result. This way Android can buffer the query results efficiently; as it does not have to load all data into memory. To get the number of elements of the resulting query use the getCount() method. To move between individual data rows, you can use the moveToFirst() and moveToNext() methods. The isAfterLast() method allows to check if the end of the query result has been reached.

Cursor provides typed get*() methods, e.g. getLong(columnIndex), getString(columnIndex) to access the column data for the current position of the result. The "columnIndex" is the number of the column you are accessing.

Cursor also provides the getColumnIndexOrThrow(String) method which allows to get the column index for a column name of the table. there are some common methdos that you will use with cursors:
  1. boolean moveToNext(): moves the cursor by one record in the result set, returns false if moved past the last row in the result set.
  2. boolean moveToFirst(): moves the cursor to the first row in the result set, returns false if the result set is empty.
  3. boolean moveToPosition(int position): moves the cursor to a certain row index within the boolean result set, returns false if the position is un-reachable
  4. boolean moveToPrevious():moves the cursor to the preevious row in the result set, returns false if the cursor is past the first row.
  5. boolean moveToLast():moves the cursor to the lase row in the result set, returns false if the result set is empty.
there are also some useful methods to check the position of a cursor: boolean isAfterLast()isBeforeFirstisFirst,isLast and isNull(columnIndex).

Monday 20 February 2012

LayOuts in Android

Layout In Android: The layout of an activity can be constructed by a XML file. These files are considered resources as they reside in res/layout folder. Each xml file consists of the declarations of widgets and their containers. The xml file is constructed in a hierarchical way, there is a tag that defines the layout of the widgets, inside this tag there are nested xml tags that define widgets, each widget tag has attributes that define the widget’s properties.  We can divide the layout in 2 ways.

1.  Android provides widgets and layouts class that are used to create the layout.
2. Second way ,You can instantiate layout elements at runtime that means programmatically in java coding.

You could declare your application's default layouts in XML, including the screen elements that will appear in them and their properties. You could then add code in your application that would modify the state of the screen objects, including those declared in XML, at run time.  You can change or modify your source code and recompile.


Attributes :-There are many type attributes in XML. View object have some type attributes eg. textSize attribute but every attributes is inherited by any View objects.id attributeed is the the root View class.

1. ID :- ID attributes uniquely identify the View within the tree. This is an XML attribute common to all View objects and you will use it very often. The

                                                  android:id="@+id/my_button"

2. Layout Parameters :-XML layout attributes named layout_something define layout parameters for the View that are appropriate for the ViewGroup in which it resides. 


You can specify width and height with exact measurements, though you probably won't want to do this often. More often, you will use one of these constants to set the width or height:
  • wrap_content tells your view to size itself to the dimensions required by its content
  • fill_parent (renamed match_parent in API Level 8) tells your view to become as big as its parent view group will allow.
Common Layout Objects:
The common Layout are:
  1. Linear layout: manages controls in horizontal or vertical way. 
  2. Table layout: manages the controls in a group of columns and rows.
  3. Relative layout: manages the controls relative to one another or to the parent.
  4. Absolute layout: manages the controls in absolute position by coordinates.
  5. Frame layout: manages the controls in a dynamic way.
  6. Scroll layout: manages the controls in a scrollable layout.
1.Frame Layout: its the simplest type of  layout object. It's basically a blank space on your screen that you can later fill with a single object — for example, a picture that you'll swap in and out. All child elements of the FrameLayout are pinned to the top left corner of the screen; you cannot specify a different location for a child view. Subsequent child views will simply be drawn over previous ones, partially or totally obscuring them (unless the newer object is transparent). Frame layout is used to display a single view at a time. The view can contain many widgets but only one will appear at a time.

2.Linear Layout: LinearLayout puts all its child elements into a single column or row depending on the android:orientation attribute. Possible values for this attribute are horizontal and vertical. horizontal is the default value. LinearLayout can be nested to achieve more complex layouts.When dealing with Linear layout there are five properties that we can deal with:

  1. Oientation.
  2. Fill model.
  3. Weight
  4. Gravity.
  5. padding.
Orientaition: Orientation property determines whether the controls would be put in a horizontal way like in a row or in a vertical way like a column. The layout orientation is set by the property android:orientation
Fill Model:
The widgets inside linear layout have width and height properties. These properties can have three values:

  1. A numeric value in pixels or inches that gives the width or height properties an absolute value. 
  2. They can have the value wrap_content meaning the widget should occupy it’s natural size unless there is no space then android can use word wrap to make the widget fit.
  3. They can have the value fill_parent meaning the widget should occupy all the available space of the closing container.
To set the fill model programmitaclly use this code:
1Button b=(Button)findViewById(R.id.btn);
2b.setWidth(LayoutParams.WRAP_CONTENT);
3b.setHeight(LayoutParams.FILL_PARENT);
Weight:
The weight property determines the ratio by which controls share free space. For example if we have two buttons and the weight of both is set to 1 (this is the default value) then the free space will be divided equally between them. But if the value of the weight of one of them is 2 and the other is one, then the first button will occupy space half as that occupied by the second and so on. 

Example code:

<linearlayout android:id="@+id/mainlayout" android:layout_height="fill_parent" android:layout_width="fill_parent" android:orientation="vertical" xmlns:android="http://schemas.android.com/apk/res/android">
<textview android:layout_height="wrap_content" android:layout_width="wrap_content" android:text="Linear Layout">
<button
android:layout_height="fill_parent"
android:layout_weight="1" 
android:layout_width="fill_parent" 
android:text="weight set to 2"
/>
<button
android:id="@+id/btn"
android:layout_height="fill_parent" 
android:layout_weight="1" 
android:layout_width="fill_parent" 
android:text="weight set to 1"
/>
</textview></linearlayout>


3.Table Layout: positions its children into rows and columns. TableLayout containers do not display border lines for their rows, columns, or cells. The table will have as many columns as the row with the most cells. A table can leave cells empty, but cells cannot span columns, as they can in HTML.
 TableRow objects are the child views of a TableLayout.

4.Relative Layout: it allow to position the widget relative to each other. This allows for complex layouts. A simple usage for RelativeLayout is if you want to center a single component.You can place a widget in a position relative to another widget’s position or relative to the container.
As we said in relative layout widgets can be placed
  1. Relative to the container.
  2. Relative to other widgets
Relative to the container :
The widgets are placed in position relative to their container like by setting the following properties:
  • android:layout_alignParentTop|Bottom|Right|Left to true. This aligns the Top|Bottom|Right|Left side of the widget with the Top|Bottom|Right|Left side of the container.
  • android:layout_centerVertical: the widget should be positioned vertically in the center of the container.
  • android:layout_centerHorizontal: the widget should be positioned horizontally in the center of the container.
  • android:layout_centerInParent: the widget should be positioned both vertically and horizontally in the middle of the container.
Position Relative to other widgets’ positions:
  • There are four properties that determine the position of the widget in relation to other widgets:
    • android:layout_above: the widget should be placed above the referenced widget. 
    • android:layout_below: the widget should be placed below the referenced widget.
    • android:layout_toRightOf: the widget should be placed to the right of the referenced widget.
    • android:layout_toLeftOf: the widget should be placed above the referenced widget.
Notes:
  • When you reference a widget in a relative layout property, you must assure that this widget has been already defined in the layout.
  • When you use the value fill_parent to assign athe height of a widget in a relative container, it could occupy all the available space so that any further controls defined in the xml file would not appear.
  • When referencing another control in relative layout property, we use the notation @id/widgetID”.
5.Grid Layout : It was introduced with Android 4.0. This layout allows you to organize a view into a Grid. GridLayout separates its drawing area into: rows, columns, and cells. You can specify how many columns you want for define for each View in which row and column it should be placed and how many columns and rows it should use. If not specified GridLayout uses defaults, e.g. one column, one row and the position of a View depends on the order of the declaration of the View.


6.Absolute Layout: Absolute layout lays widgets by specifying their exact X and Y positions. In android the origin (0,0) coordinate is located at the top left of the screen. Absolute layout is defiend in XML as <AbsoluteLayout>. By default, if you define any control in absolute layout without defining it’s x,y coordinates, it will be placed in the origin point at (x,y)=(0,0), if you define x,y values that are too large, the widget will not appear on the screen.